摘要 :在本篇文章中我将先对于灰度变换的一些基础的知识进行陈述。在那之后我将基于先前已经完成的基于图像处理的基础代码实现图像的灰度变换。为了可以绘制一幅直方图,我不得不在从底层实现一些基础的画笔工具,随后基于前面的灰度变换,我可以绘制出一幅图像的直方图。基于直方图可以对于图像的一些基础的特征进行分析。接着实现了一个可以进行直方图均衡化处理的函数,实现图像加强的目标。最后基于一种特殊的情况分析直方图均衡化的局限性。
(一)写在前面
前一段时间本人一直在进行Opencv有关的学习,可是在学完了一堆又一堆的函数之后,发现自己对于图像处理的知识其实本质上还是什么都不会。我相信真正图像处理一定不是仅仅调用几个函数就可以了事的,一些东西如果不自己敲一遍恐怕永远也无法懂得其真正的原理。所以我打算从最底层自己敲出一个轻量级的图像处理库出来。可能一开始我的代码并不可靠效率可能也赶不上那些开源库的效率,但是我坚信这个轮子造的一定是有意义的。
我目前已经将这个项目开源于githubLiteCV
(二)基础知识
(1)灰度变换
对于数字图像处理而言,一般包含着空间域处理和变换域处理两种形式。空间域处理方法主要是直接以图像中的像素操作为基础,它主要分为灰度变换和空间滤波两类。灰度变换是在图像的单个像素上操作,主要以对比度和阈值处理为目的。空间域处理可由下式表示:
g(x,y)=T[f(x,y)]其中f(x,y)是输入图像,g(x,y)是处理后的图像,T是在点(x,y)的领域上定义的关于f的一种算子。
为了保证经过灰度变换后的输出图像在整体的外貌上,或者更准确地说在形态学上,与输入图像保持一致,灰度变换函数必须是严格单调递增函数。在图像处理中,灰度变换主要应用于图像的对比度改善。在灰度变换中,最为常用的三类基本函数为线性函数(反转和恒等变换)、对数函数(对数和反对数变换)以及幂律函数(n次幂和n次根变换)。恒等函数是最一般的情况,其输出图像灰度等于输入图像灰度的变换。
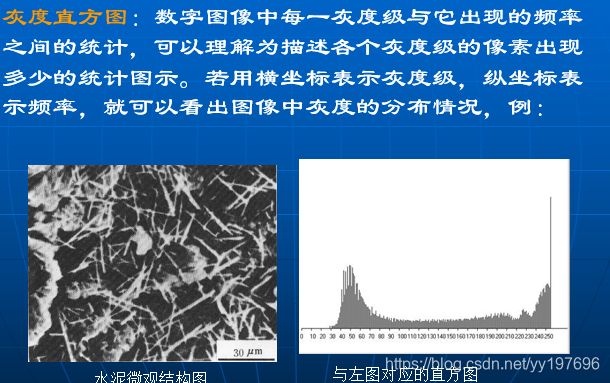
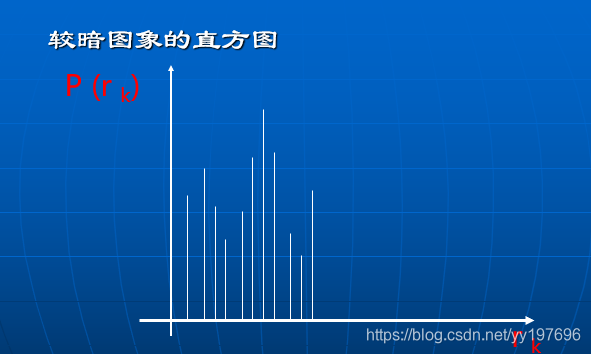
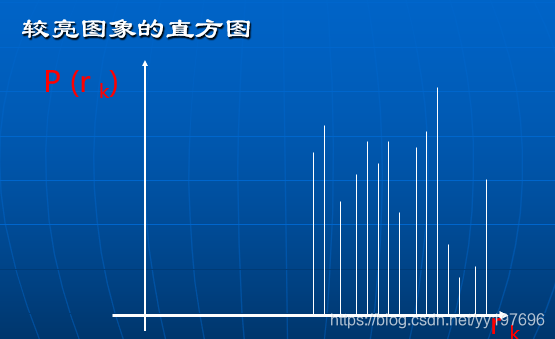
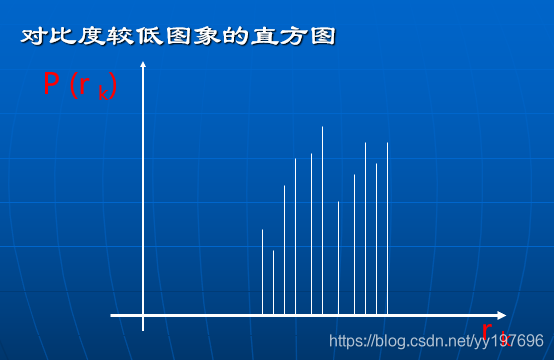
(2)灰度直方图
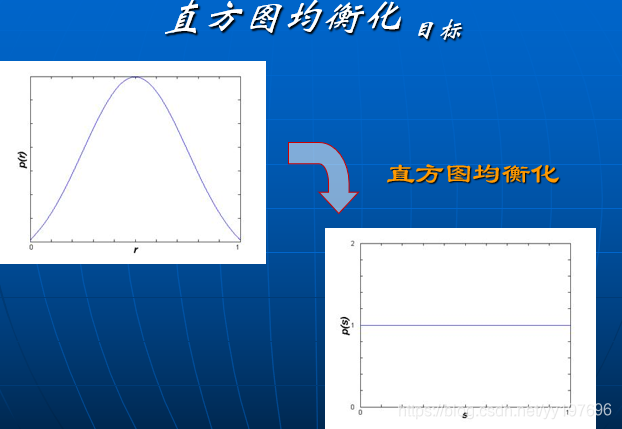
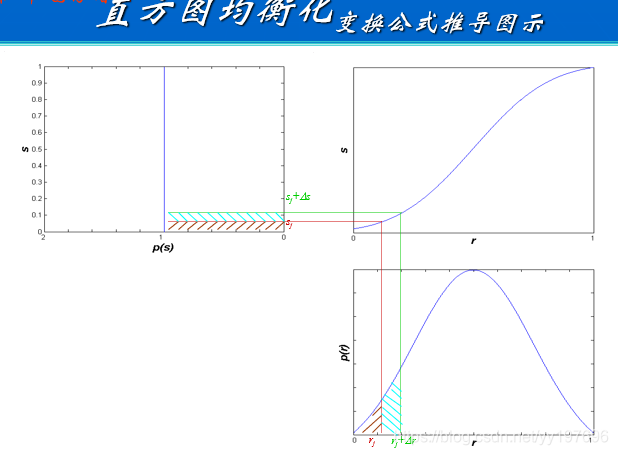
(3)基于灰度直方图的图像增强
(三)软件实现
(1)因为涉及到直方图绘制需要先,实现一个画笔工具箱
LI_API
void Li_Point(Li_Image* mat,LONG color,LONG x,LONG y)
{
    if(x>=0&&x<mat->width&&y>0&&y<mat->height)
    {
        BYTE* inaddr;
        inaddr=mat->at(mat,x,y);
        *inaddr=(u8)((color&0x00FF0000)>>16);//B
        *(inaddr+1)=(u8)((color&0x0000FF00)>>8);//G
        *(inaddr+2)=(u8)(color&0x000000FF);//R
    }
}


LI_API
void Li_Line(Li_Image* mat,LONG color,LONG x1, LONG y1, LONG x2, LONG y2)
{
    u16 t;
    int xerr=0,yerr=0,delta_x,delta_y,distance;
    int incx,incy,uRow,uCol;
    delta_x=x2-x1; //计算坐标增量
    delta_y=y2-y1;
    uRow=x1;
    uCol=y1;
    if(delta_x>0)incx=1; //设置单步方向
    else if(delta_x==0)incx=0;//垂直线
    else {incx=-1;delta_x=-delta_x;}
    if(delta_y>0)incy=1;
    else if(delta_y==0)incy=0;//水平线
    else{incy=-1;delta_y=-delta_y;}
    if( delta_x>delta_y)distance=delta_x; //选取基本增量坐标轴
    else distance=delta_y;
    for(t=0;t<=distance+1;t++ )//画线输出
    {
        Li_Point(mat,color,uRow, uCol);
        xerr+=delta_x ;
        yerr+=delta_y ;
        if(xerr>distance)
        {
            xerr-=distance;
            uRow+=incx;
        }
        if(yerr>distance)
        {
            yerr-=distance;
            uCol+=incy;
        }
    }
}

LI_API
void Li_Line_H(Li_Image* mat,LONG color,LONG x, LONG length)
{
    Li_Line(mat,color,x,0,x,length);
}

LI_API
void Li_Line_P(Li_Image* mat,LONG color,LONG threa, LONG R)
{
    float fRate = (float)(PI/180);
    for(int x=1;x<mat->width;x++)
     {
          LONG y=(R-x*cos(threa*fRate))/sin(threa* fRate);
          LONG y1=(R-(x-1)*cos(threa*fRate))/sin(threa* fRate);
          if(y<mat->height&&y1<mat->height)
          Li_Line(mat,color, x,  y,  x-1,  y1);
     }
}


LI_API
void Li_Circle(Li_Image* mat ,LONG color,LONG x0,LONG y0,LONG r)
{
    int a,b;
    int di;
    a=0;b=r;
    di=3-(r<<1);             //判断下个点位置的标志
    while(a<=b)
    {
        Li_Point(mat,color,x0+a, y0-b);
        Li_Point(mat,color,x0+b, y0-a);
        Li_Point(mat,color,x0+b, y0+a);
        Li_Point(mat,color,x0+a, y0+b);
        Li_Point(mat,color,x0-a, y0+b);
        Li_Point(mat,color,x0-b, y0+a);
        Li_Point(mat,color,x0-a, y0-b);
        Li_Point(mat,color,x0-b, y0-a);
        a++;
        //使用Bresenham算法画圆
        if(di<0)di +=4*a+6;
        else
        {
            di+=10+4*(a-b);
            b--;
        }
    }
}

LI_API
void Li_Char(Li_Image* mat,LONG color,LONG x,LONG y,BYTE num,BYTE size)
{
    u8 temp,t1,t;
    y=mat->height-y;
    u16 y0=y;
    u8 csize=(size/8+((size%8)?1:0))*(size/2);        //得到字体一个字符对应点阵集所占的字节数
    num=num-' ';//得到偏移后的值(ASCII字库是从空格开始取模,所以-' '就是对应字符的字库)
    for(t=0;t<csize;t++)
    {
        if(size==LI_FONT_12)temp=asc2_1206[num][t];         //调用1206字体
        else if(size==LI_FONT_16)temp=asc2_1608[num][t];    //调用1608字体
        else if(size==LI_FONT_24)temp=asc2_2412[num][t];    //调用2412字体
        else if(size==LI_FONT_32)temp=asc2_3216[num][t];    //调用3216字体
        else return;                                //没有的字库
        for(t1=0;t1<8;t1++)
        {
            if(temp&0x80)Li_Point(mat,color,x,mat->height-y);
            temp<<=1;
            y++;
            if(y>=mat->width)return;        //超区域了
            if((y-y0)==size)
            {
                y=y0;
                x++;
                if(x>=mat->height)return;    //超区域了
                break;
            }
        }
    }
}


LI_API
void Li_String(Li_Image* mat,LONG color,LONG x,LONG y,LONG width,LONG height,BYTE*p,BYTE size)
{
    u8 x0=x;
    width+=x;
    height+=y;
    while((*p<='~')&&(*p>=' '))//判断是不是非法字符!
    {
        if(x>=width){x=x0;y+=size;}
        if(y>=height)break;//退出
        Li_Char(mat,color,x, y, *p ,size);
        x+=size/2;
        p++;
    }
}
上面的文件涉及到一个字体文件因为文件太大这里就不具体给出,大家可以从github中下载
(2)将彩色图片灰度化
这里直接采用了256阶的灰度值,在获取灰度图片的同时返回一个数组记录整个图片的灰度值
/**
 *  Y = 0.299 * R + 0.587 * G + 0.114 * B;
    Y=D+E+F;
    D=0.299*R;
    E=0.587*G;
    F=0.114*B;
*/
static short int YMap[3][256]={
{0,0,0,0,1,1,1,2,2,2,2,3,3,3,4,4,4,5,5,5,5,6,6,6,7,7,7,8,8,8,8,9,9,9,10,10,10,11,11,11,11,12,12,12,13,13,13,14,14,14,14,15,15,15,16,16,16,17,17,17,17,18,18,18,19,19,19,20,20,20,20,21,21,21,22,22,22,23,23,23,23,24,24,24,25,25,25,25,26,26,26,27,27,27,28,28,28,28,29,29,29,30,30,30,31,31,31,31,32,32,32,33,33,33,34,34,34,34,35,35,35,36,36,36,37,37,37,37,38,38,38,39,39,39,40,40,40,40,41,41,41,42,42,42,43,43,43,43,44,44,44,45,45,45,46,46,46,46,47,47,47,48,48,48,49,49,49,49,50,50,50,51,51,51,51,52,52,52,53,53,53,54,54,54,54,55,55,55,56,56,56,57,57,57,57,58,58,58,59,59,59,60,60,60,60,61,61,61,62,62,62,63,63,63,63,64,64,64,65,65,65,66,66,66,66,67,67,67,68,68,68,69,69,69,69,70,70,70,71,71,71,72,72,72,72,73,73,73,74,74,74,75,75,75,75,76},
{0,0,1,1,2,2,3,4,4,5,5,6,7,7,8,8,9,9,10,11,11,12,12,13,14,14,15,15,16,17,17,18,18,19,19,20,21,21,22,22,23,24,24,25,25,26,26,27,28,28,29,29,30,31,31,32,32,33,34,34,35,35,36,36,37,38,38,39,39,40,41,41,42,42,43,44,44,45,45,46,46,47,48,48,49,49,50,51,51,52,52,53,53,54,55,55,56,56,57,58,58,59,59,60,61,61,62,62,63,63,64,65,65,66,66,67,68,68,69,69,70,71,71,72,72,73,73,74,75,75,76,76,77,78,78,79,79,80,80,81,82,82,83,83,84,85,85,86,86,87,88,88,89,89,90,90,91,92,92,93,93,94,95,95,96,96,97,98,98,99,99,100,100,101,102,102,103,103,104,105,105,106,106,107,107,108,109,109,110,110,111,112,112,113,113,114,115,115,116,116,117,117,118,119,119,120,120,121,122,122,123,123,124,125,125,126,126,127,127,128,129,129,130,130,131,132,132,133,133,134,134,135,136,136,137,137,138,139,139,140,140,141,142,142,143,143,144,144,145,146,146,147,147,148,149,149},
{0,0,0,0,0,0,0,0,0,1,1,1,1,1,1,1,1,1,2,2,2,2,2,2,2,2,2,3,3,3,3,3,3,3,3,3,4,4,4,4,4,4,4,4,5,5,5,5,5,5,5,5,5,6,6,6,6,6,6,6,6,6,7,7,7,7,7,7,7,7,7,8,8,8,8,8,8,8,8,9,9,9,9,9,9,9,9,9,10,10,10,10,10,10,10,10,10,11,11,11,11,11,11,11,11,11,12,12,12,12,12,12,12,12,12,13,13,13,13,13,13,13,13,14,14,14,14,14,14,14,14,14,15,15,15,15,15,15,15,15,15,16,16,16,16,16,16,16,16,16,17,17,17,17,17,17,17,17,18,18,18,18,18,18,18,18,18,19,19,19,19,19,19,19,19,19,20,20,20,20,20,20,20,20,20,21,21,21,21,21,21,21,21,22,22,22,22,22,22,22,22,22,23,23,23,23,23,23,23,23,23,24,24,24,24,24,24,24,24,24,25,25,25,25,25,25,25,25,25,26,26,26,26,26,26,26,26,27,27,27,27,27,27,27,27,27,28,28,28,28,28,28,28,28,28,29}
};

/**
 *  U = - 0.1687 R - 0.3313 G + 0.5 B + 128
    Y=D+E+F;
    D=- 0.1687 R;
    E=- 0.3313 G;
    F=  0.5 B;
*/
static short int UMap[3][256]={
{0,-1,-1,-1,-1,-1,-2,-2,-2,-2,-2,-2,-3,-3,-3,-3,-3,-3,-4,-4,-4,-4,-4,-4,-5,-5,-5,-5,-5,-5,-6,-6,-6,-6,-6,-6,-7,-7,-7,-7,-7,-7,-8,-8,-8,-8,-8,-8,-9,-9,-9,-9,-9,-9,-10,-10,-10,-10,-10,-10,-11,-11,-11,-11,-11,-11,-12,-12,-12,-12,-12,-12,-13,-13,-13,-13,-13,-13,-14,-14,-14,-14,-14,-15,-15,-15,-15,-15,-15,-16,-16,-16,-16,-16,-16,-17,-17,-17,-17,-17,-17,-18,-18,-18,-18,-18,-18,-19,-19,-19,-19,-19,-19,-20,-20,-20,-20,-20,-20,-21,-21,-21,-21,-21,-21,-22,-22,-22,-22,-22,-22,-23,-23,-23,-23,-23,-23,-24,-24,-24,-24,-24,-24,-25,-25,-25,-25,-25,-25,-26,-26,-26,-26,-26,-26,-27,-27,-27,-27,-27,-27,-28,-28,-28,-28,-28,-29,-29,-29,-29,-29,-29,-30,-30,-30,-30,-30,-30,-31,-31,-31,-31,-31,-31,-32,-32,-32,-32,-32,-32,-33,-33,-33,-33,-33,-33,-34,-34,-34,-34,-34,-34,-35,-35,-35,-35,-35,-35,-36,-36,-36,-36,-36,-36,-37,-37,-37,-37,-37,-37,-38,-38,-38,-38,-38,-38,-39,-39,-39,-39,-39,-39,-40,-40,-40,-40,-40,-40,-41,-41,-41,-41,-41,-41,-42,-42,-42,-42,-42,-43,-43,-43,-43,-43,-43,-44},
{0,-1,-1,-1,-2,-2,-2,-3,-3,-3,-4,-4,-4,-5,-5,-5,-6,-6,-6,-7,-7,-7,-8,-8,-8,-9,-9,-9,-10,-10,-10,-11,-11,-11,-12,-12,-12,-13,-13,-13,-14,-14,-14,-15,-15,-15,-16,-16,-16,-17,-17,-17,-18,-18,-18,-19,-19,-19,-20,-20,-20,-21,-21,-21,-22,-22,-22,-23,-23,-23,-24,-24,-24,-25,-25,-25,-26,-26,-26,-27,-27,-27,-28,-28,-28,-29,-29,-29,-30,-30,-30,-31,-31,-31,-32,-32,-32,-33,-33,-33,-34,-34,-34,-35,-35,-35,-36,-36,-36,-37,-37,-37,-38,-38,-38,-39,-39,-39,-40,-40,-40,-41,-41,-41,-42,-42,-42,-43,-43,-43,-44,-44,-44,-45,-45,-45,-46,-46,-46,-47,-47,-47,-48,-48,-48,-49,-49,-49,-50,-50,-50,-51,-51,-51,-52,-52,-52,-53,-53,-53,-54,-54,-54,-55,-55,-55,-55,-56,-56,-56,-57,-57,-57,-58,-58,-58,-59,-59,-59,-60,-60,-60,-61,-61,-61,-62,-62,-62,-63,-63,-63,-64,-64,-64,-65,-65,-65,-66,-66,-66,-67,-67,-67,-68,-68,-68,-69,-69,-69,-70,-70,-70,-71,-71,-71,-72,-72,-72,-73,-73,-73,-74,-74,-74,-75,-75,-75,-76,-76,-76,-77,-77,-77,-78,-78,-78,-79,-79,-79,-80,-80,-80,-81,-81,-81,-82,-82,-82,-83,-83,-83,-84,-84,-84,-85,-85},
{0,0,1,1,2,2,3,3,4,4,5,5,6,6,7,7,8,8,9,9,10,10,11,11,12,12,13,13,14,14,15,15,16,16,17,17,18,18,19,19,20,20,21,21,22,22,23,23,24,24,25,25,26,26,27,27,28,28,29,29,30,30,31,31,32,32,33,33,34,34,35,35,36,36,37,37,38,38,39,39,40,40,41,41,42,42,43,43,44,44,45,45,46,46,47,47,48,48,49,49,50,50,51,51,52,52,53,53,54,54,55,55,56,56,57,57,58,58,59,59,60,60,61,61,62,62,63,63,64,64,65,65,66,66,67,67,68,68,69,69,70,70,71,71,72,72,73,73,74,74,75,75,76,76,77,77,78,78,79,79,80,80,81,81,82,82,83,83,84,84,85,85,86,86,87,87,88,88,89,89,90,90,91,91,92,92,93,93,94,94,95,95,96,96,97,97,98,98,99,99,100,100,101,101,102,102,103,103,104,104,105,105,106,106,107,107,108,108,109,109,110,110,111,111,112,112,113,113,114,114,115,115,116,116,117,117,118,118,119,119,120,120,121,121,122,122,123,123,124,124,125,125,126,126,127,127}
};
/**
 *  V = 0.5 R - 0.4187 G - 0.0813 B + 128
    Y=D+E+F;
    D=  0.5 R;
    E=- 0.4187 G ;
    F=- 0.0813 B;
*/
static short int VMap[3][256]={
{0,0,1,1,2,2,3,3,4,4,5,5,6,6,7,7,8,8,9,9,10,10,11,11,12,12,13,13,14,14,15,15,16,16,17,17,18,18,19,19,20,20,21,21,22,22,23,23,24,24,25,25,26,26,27,27,28,28,29,29,30,30,31,31,32,32,33,33,34,34,35,35,36,36,37,37,38,38,39,39,40,40,41,41,42,42,43,43,44,44,45,45,46,46,47,47,48,48,49,49,50,50,51,51,52,52,53,53,54,54,55,55,56,56,57,57,58,58,59,59,60,60,61,61,62,62,63,63,64,64,65,65,66,66,67,67,68,68,69,69,70,70,71,71,72,72,73,73,74,74,75,75,76,76,77,77,78,78,79,79,80,80,81,81,82,82,83,83,84,84,85,85,86,86,87,87,88,88,89,89,90,90,91,91,92,92,93,93,94,94,95,95,96,96,97,97,98,98,99,99,100,100,101,101,102,102,103,103,104,104,105,105,106,106,107,107,108,108,109,109,110,110,111,111,112,112,113,113,114,114,115,115,116,116,117,117,118,118,119,119,120,120,121,121,122,122,123,123,124,124,125,125,126,126,127,127},
{0,-1,-1,-2,-2,-3,-3,-3,-4,-4,-5,-5,-6,-6,-6,-7,-7,-8,-8,-8,-9,-9,-10,-10,-11,-11,-11,-12,-12,-13,-13,-13,-14,-14,-15,-15,-16,-16,-16,-17,-17,-18,-18,-19,-19,-19,-20,-20,-21,-21,-21,-22,-22,-23,-23,-24,-24,-24,-25,-25,-26,-26,-26,-27,-27,-28,-28,-29,-29,-29,-30,-30,-31,-31,-31,-32,-32,-33,-33,-34,-34,-34,-35,-35,-36,-36,-37,-37,-37,-38,-38,-39,-39,-39,-40,-40,-41,-41,-42,-42,-42,-43,-43,-44,-44,-44,-45,-45,-46,-46,-47,-47,-47,-48,-48,-49,-49,-49,-50,-50,-51,-51,-52,-52,-52,-53,-53,-54,-54,-55,-55,-55,-56,-56,-57,-57,-57,-58,-58,-59,-59,-60,-60,-60,-61,-61,-62,-62,-62,-63,-63,-64,-64,-65,-65,-65,-66,-66,-67,-67,-67,-68,-68,-69,-69,-70,-70,-70,-71,-71,-72,-72,-73,-73,-73,-74,-74,-75,-75,-75,-76,-76,-77,-77,-78,-78,-78,-79,-79,-80,-80,-80,-81,-81,-82,-82,-83,-83,-83,-84,-84,-85,-85,-85,-86,-86,-87,-87,-88,-88,-88,-89,-89,-90,-90,-91,-91,-91,-92,-92,-93,-93,-93,-94,-94,-95,-95,-96,-96,-96,-97,-97,-98,-98,-98,-99,-99,-100,-100,-101,-101,-101,-102,-102,-103,-103,-104,-104,-104,-105,-105,-106,-106,-106,-107,-107},
{0,-1,-1,-1,-1,-1,-1,-1,-1,-1,-1,-1,-1,-2,-2,-2,-2,-2,-2,-2,-2,-2,-2,-2,-2,-3,-3,-3,-3,-3,-3,-3,-3,-3,-3,-3,-3,-4,-4,-4,-4,-4,-4,-4,-4,-4,-4,-4,-4,-4,-5,-5,-5,-5,-5,-5,-5,-5,-5,-5,-5,-5,-6,-6,-6,-6,-6,-6,-6,-6,-6,-6,-6,-6,-7,-7,-7,-7,-7,-7,-7,-7,-7,-7,-7,-7,-7,-8,-8,-8,-8,-8,-8,-8,-8,-8,-8,-8,-8,-9,-9,-9,-9,-9,-9,-9,-9,-9,-9,-9,-9,-10,-10,-10,-10,-10,-10,-10,-10,-10,-10,-10,-10,-10,-11,-11,-11,-11,-11,-11,-11,-11,-11,-11,-11,-11,-12,-12,-12,-12,-12,-12,-12,-12,-12,-12,-12,-12,-13,-13,-13,-13,-13,-13,-13,-13,-13,-13,-13,-13,-14,-14,-14,-14,-14,-14,-14,-14,-14,-14,-14,-14,-14,-15,-15,-15,-15,-15,-15,-15,-15,-15,-15,-15,-15,-16,-16,-16,-16,-16,-16,-16,-16,-16,-16,-16,-16,-17,-17,-17,-17,-17,-17,-17,-17,-17,-17,-17,-17,-17,-18,-18,-18,-18,-18,-18,-18,-18,-18,-18,-18,-18,-19,-19,-19,-19,-19,-19,-19,-19,-19,-19,-19,-19,-20,-20,-20,-20,-20,-20,-20,-20,-20,-20,-20,-20,-20,-21,-21,-21,-21,-21,-21,-21,-21,-21}
};
//     b = 1.164*y+2.018*u-277;
//     g = 1.164*y-0.380*u-0.813*v+134;
//     r = 1.164*y+1.159*v-148;
static short int BUMap[3][256]={
{0,1,2,3,4,5,6,8,9,10,11,12,13,15,16,17,18,19,20,22,23,24,25,26,27,29,30,31,32,33,34,36,37,38,39,40,41,43,44,45,46,47,48,50,51,52,53,54,55,57,58,59,60,61,62,64,65,66,67,68,69,71,72,73,74,75,76,77,79,80,81,82,83,84,86,87,88,89,90,91,93,94,95,96,97,98,100,101,102,103,104,105,107,108,109,110,111,112,114,115,116,117,118,119,121,122,123,124,125,126,128,129,130,131,132,133,135,136,137,138,139,140,142,143,144,145,146,147,149,150,151,152,153,154,155,157,158,159,160,161,162,164,165,166,167,168,169,171,172,173,174,175,176,178,179,180,181,182,183,185,186,187,188,189,190,192,193,194,195,196,197,199,200,201,202,203,204,206,207,208,209,210,211,213,214,215,216,217,218,220,221,222,223,224,225,226,228,229,230,231,232,233,235,236,237,238,239,240,242,243,244,245,246,247,249,250,251,252,253,254,256,257,258,259,260,261,263,264,265,266,267,268,270,271,272,273,274,275,277,278,279,280,281,282,284,285,286,287,288,289,291,292,293,294,295,296},
{0,2,4,6,8,10,12,14,16,18,20,22,24,26,28,30,32,34,36,38,40,42,44,46,48,50,52,54,56,58,60,62,64,66,68,70,72,74,76,78,80,82,84,86,88,90,92,94,96,98,100,102,104,106,108,110,113,115,117,119,121,123,125,127,129,131,133,135,137,139,141,143,145,147,149,151,153,155,157,159,161,163,165,167,169,171,173,175,177,179,181,183,185,187,189,191,193,195,197,199,201,203,205,207,209,211,213,215,217,219,221,224,226,228,230,232,234,236,238,240,242,244,246,248,250,252,254,256,258,260,262,264,266,268,270,272,274,276,278,280,282,284,286,288,290,292,294,296,298,300,302,304,306,308,310,312,314,316,318,320,322,324,326,328,330,332,334,337,339,341,343,345,347,349,351,353,355,357,359,361,363,365,367,369,371,373,375,377,379,381,383,385,387,389,391,393,395,397,399,401,403,405,407,409,411,413,415,417,419,421,423,425,427,429,431,433,435,437,439,441,443,445,448,450,452,454,456,458,460,462,464,466,468,470,472,474,476,478,480,482,484,486,488,490,492,494,496,498,500,502,504,506,508,510,512,514}
};
static short int GUMap[3][256]={
{0,1,2,3,4,5,6,8,9,10,11,12,13,15,16,17,18,19,20,22,23,24,25,26,27,29,30,31,32,33,34,36,37,38,39,40,41,43,44,45,46,47,48,50,51,52,53,54,55,57,58,59,60,61,62,64,65,66,67,68,69,71,72,73,74,75,76,77,79,80,81,82,83,84,86,87,88,89,90,91,93,94,95,96,97,98,100,101,102,103,104,105,107,108,109,110,111,112,114,115,116,117,118,119,121,122,123,124,125,126,128,129,130,131,132,133,135,136,137,138,139,140,142,143,144,145,146,147,149,150,151,152,153,154,155,157,158,159,160,161,162,164,165,166,167,168,169,171,172,173,174,175,176,178,179,180,181,182,183,185,186,187,188,189,190,192,193,194,195,196,197,199,200,201,202,203,204,206,207,208,209,210,211,213,214,215,216,217,218,220,221,222,223,224,225,226,228,229,230,231,232,233,235,236,237,238,239,240,242,243,244,245,246,247,249,250,251,252,253,254,256,257,258,259,260,261,263,264,265,266,267,268,270,271,272,273,274,275,277,278,279,280,281,282,284,285,286,287,288,289,291,292,293,294,295,296},
{0,0,0,1,1,1,2,2,3,3,3,4,4,4,5,5,6,6,6,7,7,7,8,8,9,9,9,10,10,11,11,11,12,12,12,13,13,14,14,14,15,15,15,16,16,17,17,17,18,18,18,19,19,20,20,20,21,21,22,22,22,23,23,23,24,24,25,25,25,26,26,26,27,27,28,28,28,29,29,30,30,30,31,31,31,32,32,33,33,33,34,34,34,35,35,36,36,36,37,37,37,38,38,39,39,39,40,40,41,41,41,42,42,42,43,43,44,44,44,45,45,45,46,46,47,47,47,48,48,49,49,49,50,50,50,51,51,52,52,52,53,53,53,54,54,55,55,55,56,56,56,57,57,58,58,58,59,59,60,60,60,61,61,61,62,62,63,63,63,64,64,64,65,65,66,66,66,67,67,67,68,68,69,69,69,70,70,71,71,71,72,72,72,73,73,74,74,74,75,75,75,76,76,77,77,77,78,78,79,79,79,80,80,80,81,81,82,82,82,83,83,83,84,84,85,85,85,86,86,86,87,87,88,88,88,89,89,90,90,90,91,91,91,92,92,93,93,93,94,94,94,95,95,96,96,96},
{0,0,1,2,3,4,4,5,6,7,8,8,9,10,11,12,13,13,14,15,16,17,17,18,19,20,21,21,22,23,24,25,26,26,27,28,29,30,30,31,32,33,34,34,35,36,37,38,39,39,40,41,42,43,43,44,45,46,47,47,48,49,50,51,52,52,53,54,55,56,56,57,58,59,60,60,61,62,63,64,65,65,66,67,68,69,69,70,71,72,73,73,74,75,76,77,78,78,79,80,81,82,82,83,84,85,86,86,87,88,89,90,91,91,92,93,94,95,95,96,97,98,99,99,100,101,102,103,104,104,105,106,107,108,108,109,110,111,112,113,113,114,115,116,117,117,118,119,120,121,121,122,123,124,125,126,126,127,128,129,130,130,131,132,133,134,134,135,136,137,138,139,139,140,141,142,143,143,144,145,146,147,147,148,149,150,151,152,152,153,154,155,156,156,157,158,159,160,160,161,162,163,164,165,165,166,167,168,169,169,170,171,172,173,173,174,175,176,177,178,178,179,180,181,182,182,183,184,185,186,186,187,188,189,190,191,191,192,193,194,195,195,196,197,198,199,199,200,201,202,203,204,204,205,206,207}
};
static short int RUMap[3][256]={
{0,1,2,3,4,5,6,8,9,10,11,12,13,15,16,17,18,19,20,22,23,24,25,26,27,29,30,31,32,33,34,36,37,38,39,40,41,43,44,45,46,47,48,50,51,52,53,54,55,57,58,59,60,61,62,64,65,66,67,68,69,71,72,73,74,75,76,77,79,80,81,82,83,84,86,87,88,89,90,91,93,94,95,96,97,98,100,101,102,103,104,105,107,108,109,110,111,112,114,115,116,117,118,119,121,122,123,124,125,126,128,129,130,131,132,133,135,136,137,138,139,140,142,143,144,145,146,147,149,150,151,152,153,154,155,157,158,159,160,161,162,164,165,166,167,168,169,171,172,173,174,175,176,178,179,180,181,182,183,185,186,187,188,189,190,192,193,194,195,196,197,199,200,201,202,203,204,206,207,208,209,210,211,213,214,215,216,217,218,220,221,222,223,224,225,226,228,229,230,231,232,233,235,236,237,238,239,240,242,243,244,245,246,247,249,250,251,252,253,254,256,257,258,259,260,261,263,264,265,266,267,268,270,271,272,273,274,275,277,278,279,280,281,282,284,285,286,287,288,289,291,292,293,294,295,296},
{0,0,0,0,0,0,0,0,0,0,0,0,0,0,0,0,0,0,0,0,0,0,0,0,0,0,0,0,0,0,0,0,0,0,0,0,0,0,0,0,0,0,0,0,0,0,0,0,0,0,0,0,0,0,0,0,0,0,0,0,0,0,0,0,0,0,0,0,0,0,0,0,0,0,0,0,0,0,0,0,0,0,0,0,0,0,0,0,0,0,0,0,0,0,0,0,0,0,0,0,0,0,0,0,0,0,0,0,0,0,0,0,0,0,0,0,0,0,0,0,0,0,0,0,0,0,0,0,0,0,0,0,0,0,0,0,0,0,0,0,0,0,0,0,0,0,0,0,0,0,0,0,0,0,0,0,0,0,0,0,0,0,0,0,0,0,0,0,0,0,0,0,0,0,0,0,0,0,0,0,0,0,0,0,0,0,0,0,0,0,0,0,0,0,0,0,0,0,0,0,0,0,0,0,0,0,0,0,0,0,0,0,0,0,0,0,0,0,0,0,0,0,0,0,0,0,0,0,0,0,0,0,0,0,0,0,0,0,0,0,0,0,0,0,0,0,0,0,0,0,0,0,0,0,0,0},
{0,1,2,3,4,5,6,8,9,10,11,12,13,15,16,17,18,19,20,22,23,24,25,26,27,28,30,31,32,33,34,35,37,38,39,40,41,42,44,45,46,47,48,49,50,52,53,54,55,56,57,59,60,61,62,63,64,66,67,68,69,70,71,73,74,75,76,77,78,79,81,82,83,84,85,86,88,89,90,91,92,93,95,96,97,98,99,100,101,103,104,105,106,107,108,110,111,112,113,114,115,117,118,119,120,121,122,124,125,126,127,128,129,130,132,133,134,135,136,137,139,140,141,142,143,144,146,147,148,149,150,151,152,154,155,156,157,158,159,161,162,163,164,165,166,168,169,170,171,172,173,174,176,177,178,179,180,181,183,184,185,186,187,188,190,191,192,193,194,195,197,198,199,200,201,202,203,205,206,207,208,209,210,212,213,214,215,216,217,219,220,221,222,223,224,225,227,228,229,230,231,232,234,235,236,237,238,239,241,242,243,244,245,246,248,249,250,251,252,253,254,256,257,258,259,260,261,263,264,265,266,267,268,270,271,272,273,274,275,276,278,279,280,281,282,283,285,286,287,288,289,290,292,293,294,295}
};

/** RGB转灰度转换关系表
 *  Grey = (R*1 + G*2 + B*1) >> 2
    Grey= (R*2 + G*5 + B*1) >> 3
    Grey= (R*4 + G*10 + B*2) >> 4
    Grey = (R*9 + G*19 + B*4) >> 5
    Grey = (R*19 + G*37 + B*8) >> 6
    Grey= (R*38 + G*75 + B*15) >> 7
    Grey= (R*76 + G*150 + B*30) >> 8
    Grey = (R*153 + G*300 + B*59) >> 9
    Grey = (R*306 + G*601 + B*117) >> 10
    Grey = (R*612 + G*1202 + B*234) >> 11
    Grey = (R*1224 + G*2405 + B*467) >> 12
    Grey= (R*2449 + G*4809 + B*934) >> 13
    Grey= (R*4898 + G*9618 + B*1868) >> 14
    Grey = (R*9797 + G*19235 + B*3736) >> 15
    Grey = (R*19595 + G*38469 + B*7472) >> 16
    Grey = (R*39190 + G*76939 + B*14943) >> 17
    Grey = (R*78381 + G*153878 + B*29885) >> 18
    Grey =(R*156762 + G*307757 + B*59769) >> 19
    Grey= (R*313524 + G*615514 + B*119538) >> 20
 *
 */
//默认采用四位精度表示
//Grey= (R*4 + G*10 + B*2) >> 4
//Grey = (R*1224 + G*2405 + B*467) >> 12
//site 精确度
void Li_Arr_bgr_gray( LiArr* src,LiArr *dst,LONG width,LONG height,BYTE site)
{
  int x,y;
  switch (site)
  {

  case 0: //查表法实现灰度转换 12位
    for(x=0;x<height;x++)
      for(y=0;y<width;y++)
      {
        *((BYTE*)dst+width*x+y)=(YMap[2][*((BYTE*)src+3*width*x+3*y)]) //B
                                    +YMap[1][(*((BYTE*)src+3*width*x+3*y+1))] //G
                                      +YMap[0][(*((BYTE*)src+3*width*x+3*y+2))]; //R
      }
  break;

  case 4:
    for(x=0;x<height;x++)
      for(y=0;y<width;y++)
      {
        *((BYTE*)dst+width*x+y)=(*((BYTE*)src+3*width*x+3*y)*2) //B
                                    +(*((BYTE*)src+3*width*x+3*y+1)*10) //G
                                      +(*((BYTE*)src+3*width*x+3*y+2)*4)>>4; //R
      }
    break;

    case 8:
    for(x=0;x<height;x++)
      for(y=0;y<width;y++)
      {
        *((BYTE*)dst+width*x+y)=(*((BYTE*)src+3*width*x+3*y)*30) //B
                                    +(*((BYTE*)src+3*width*x+3*y+150)*10) //G
                                      +(*((BYTE*)src+3*width*x+3*y+2)*76)>>8; //R
      }
    break;

   case 16:
    for(x=0;x<height;x++)
      for(y=0;y<width;y++)
      {
        *((BYTE*)dst+width*x+y)=(*((BYTE*)src+3*width*x+3*y)*7472) //B
                                    +(*((BYTE*)src+3*width*x+3*y+150)*38469) //G
                                      +(*((BYTE*)src+3*width*x+3*y+2)*19595)>>16; //R
      }
    break;

  default:
    break;
  }

}
(3)统计概率,绘制直方图
//一张灰度直方图数据表
typedef struct tagLi_Hist
{
    float data[256];
}Li_Hist;

Li_Hist* Li_Create_Hist(float* data)
{
    Li_Hist* hist=(Li_Hist*)malloc(sizeof(Li_Hist));
    memcpy(hist->data,data,256*sizeof(float));
    return hist;
}


void Li_Destroy_Hist(Li_Hist* hist)
{
    free(hist);
}

/**
 * @name: Li_Print_Hist
 * @msg: 打印直方图
 * @param {Li_Hist* hist}
 * @return {*}
 */
LI_API
void Li_Print_Hist(Li_Hist* hist)
{
    printf("[ ");
    for(int i=0;i<256;i++)
    {
        printf("%f ",hist->data[i]);
    }
    printf(" ]");
}
/**
 * @name: Li_Visual_Hist
 * @msg: 直方图转化为图像
 * @param {Li_Hist* hist}
 * @return {Li_Image*}
 */
LI_API
Li_Image* Li_Visual_Hist(Li_Hist* hist)
{
    Li_Image* img=Li_Create_Image(256,256,LI_DEP_24U,LI_BMP_888);
    float max=0,div=0;
    for(int i=0;i<256;i++)
    {
        if(hist->data[i]>max)
            max=hist->data[i];
    }
    div=256/max;
    for(int i=0;i<256;i++)
    {
        Li_Line_H(img,0x0000FF,i,hist->data[i]*div);
    }
    return img;
}
/**
 * @name: Li_Get_Hist
 * @msg: 绘制直方图
 * @param {Li_Image* img 图像}
 * @return {Li_Hist* 直方图数据}
 */
LI_API
Li_Hist* Li_Get_Hist(Li_Image* img)
{
   if(img->imgdepth!=LI_DEP_8U)return NULL;

   float* buffer;//存储0-255的数值出现的次数
   float* result;
   int length=img->width*img->height;
   //将申请的地址全部初始化为0
   buffer=malloc(256*sizeof(float));
   result=malloc(256*sizeof(float));
   memset(buffer,0,256*4);
   memset(result,0,256*4);

   for(int i=0;i<length;i++)
   {
      BYTE off=*((BYTE*)img->data+i);
      buffer[off]++;
   }

   for(int i=0;i<256;i++)
   {
      result[i]=buffer[i]/length;
   }
   Li_Hist* hist=Li_Create_Hist(result);
   return hist;
}
(4)直方图均衡化算法实现
/**
 * @name: Li_Normalize_Hist
 * @msg: 直方图均衡化
 * @param {Li_Image* img}
 * @return {*}
 */
LI_API
Li_Image* Li_Normalize_Hist(Li_Image* img)
{
    Li_Image* dst=Li_Copy_Image(img);
    Li_Hist* Hist= Li_Get_Hist(img);
    float Max,Min;
    float sum[256];
    BYTE out[256];//对于源灰度值产生进行新的映射表
    BYTE* buf=malloc(img->width*img->height*sizeof(BYTE));
    //找到原图灰度值中的最大值和最小值
    //一般而言应该是0-255
    for(int i=1;i<img->width*img->height;i++)
    {
        if(*((BYTE*)img->data+i)>Max)
        {
            Max=*((BYTE*)img->data+i);
        }
         if(*((BYTE*)img->data+i)<Min)
        {
            Min=*((BYTE*)img->data+i);
        }
    }
    BYTE* inaddr;
    float* data=Hist->data;
    //计算累计概率和
    sum[0]=*data;
    for(int i=1;i<=255;i++)
    {
       sum[i]=sum[i-1]+*(data+i);
       out[i]=(BYTE)(sum[i]*(Max-Min));//获得一张新的灰度值表
    }

   for(int x=0;x<dst->width;x++)
   for(int y=0;y<dst->height;y++)
   {
        inaddr=dst->at(dst,x,y);
        BYTE temp=*inaddr;
       *(inaddr)=out[temp];
   }
   return dst;
}
(四)效果测试
原图
图像加强后
我们可以明显看到图像清晰度的增强。
(五)局限性分析
这张加强显然不是万能的,在进行一幅图片的加强的时候就出现了非常极端的情况。
非常明显当原图亮度过高,或者在某一灰度值出现次数太多,就一定会出现这种失真。